I posted my first blog entry on July 26th, 2010. That was one year ago. The reason I started to blog was to share ideas on play in and around the sensory table by showing how to build simple, cheap apparatus to enhance exploration and experimentation.
I was introduced to the blogging world by my oldest daughter who was living and working in Peru at the time. She was an inspiration chronicling her micro-credit work with women in the Northern Highlands of the Peru. She had told me it was easy to start, but difficult to keep up. I am like most people; starting new things takes some effort, especially when it comes to technology. I actually tried to start my blog a year earlier, but quickly lost steam. As far as keeping up the blog, I find the only way to do it is to keep a schedule. I have set a Thursday deadline for a weekly post. That arbitrary deadline is the only thing that keeps me on track.
So have my reasons for blogging changed? They have not changed, but they have multiplied. One of the bonuses of blogging is that I am no longer that solitary teacher planning all the day's activities. I am now plugged into an expanding group of people who love to share their thoughts, ideas, and comments. It is the true essence of play: we are invited into each others' houses or backyards for a give-an-take of ideas. That give-and-take allows each of us to borrow, add, and change in our practice to fit our own purposes. And, oh what fun!
One huge added benefit for me has been re-examing the pictures and videos I have taken over the years. Though showing an apparatus may be the impetus for any given post, the documentation of how the children use it has become the focus for me. The whole process from selecting the pictures and videos to the final editing of the post has given me new insights into just how capable young children are in their explorations and discoveries. I may have had an initial idea of how the children might approach any given apparatus, but inevitably they add their own ideas and make it their own in ways I could never have imagined.
I still have a few apparatus to share, so I will continue blogging for the time being. And besides, I want to keep playing.
If you are wondering about blogging here are a couple of good posts to check out. One is from Teacher Tom in Seattle. He has a post called: What Part do I Play? And then Jenny in Australia from her blog let the children play has a post called: 10 good reasons why teachers should blog. And just this week, Pam in Iowa from the blog How Long is this Hall wrote a post called Funny thing is... All have to do with reasons for blogging. Check them out.
About Me

- Tom Bedard
- Early childhood education has been my life for over 40 years. I have taught all age groups from infants to 5-year-olds. I was a director for five years in the 1980s, but I returned to the classroom 22 years ago. My passion is watching the ways children explore and discover their world. In the classroom, everything starts with the reciprocal relationships between adults and children and between the children themselves. With that in mind, I plan and set up activities. But that is just the beginning. What actually happens is a flow that includes my efforts to invite, respond and support children's interface with those activities and with others in the room. Oh yeh, and along the way, the children change the activities to suit their own inventiveness and creativity. Now the processes become reciprocal with the children doing the inviting, responding and supporting. Young children are the best learners and teachers. I am truly fortunate to be a part of their journey.
Thursday, July 28, 2011
Thursday, July 21, 2011
BIG BOX INCLINE
Many times the cardboard apparatus I build for the sensory table is determined by the size and shape of the box. For the longest time, I had been saving a large, rectangular box trying to figure out what to do with it. I settled on a design that put it on an incline over the table.

I used a planter tray turned upside down to support the box and give it its incline. The end of the box was set over the lip of the table so when the children poured the sand or corn into the inclined box, it would drop into a tub next to the table. The box was very sturdy, so there was no need to reinforce the structure. This is essentially a large, enclosed chute.
Because the box was so large and sturdy, I was able to cut out big holes in the side for access to the chute at different levels.

If you look at the above picture, you might think that the corn or sand is blocked at the bottom of the chute by a cardboard piece. There is actually a slit cut in the bottom of the box before the cardboard piece that allows the sand or corn to drop into the tub next to the table. If you look at the picture below, you can see the slit just below the girl's arm.

In other versions, the chute is completely open.


Often times, the focal point of play with this apparatus is the top hole. Children have to reach up to pour the corn down the chute.

There are various large muscle challenges to doing this depending on how tall you are or what implements you might use. If you use a shovel as opposed to a spoon, how much can you get in the chute?
Take a look at this video to see some of the large muscle challenges to pouring corn down the big box incline.
The girl wants to pour the corn down the chute. She is at the side of the table. She has already gathered the corn in her little pail. As the video begins, she is deciding how to hold the little pail. She holds it on the bottom with her right hand. She thinks about grabbing the handle, but decides to balance it in her right hand because she needs her left hand to balance herself as she shifts her weight to pour the corn. She reaches to grab the end of the box, puts her foot on the lip of the table and shifts her weight to pour. If you watch her, she is quite stable with three points of support: one foot on a stool, one foot on the lip of the table, and a hand on the box. With the physical extension and balance required to complete this task, it becomes so much more than just pouring the corn.

Another focal point of play is the bottom of the giant chute. That is true whether you are trying to catch the corn coming down...

or whether you want to climb right into the bottom of the box to push the corn up with your bulldozer. By the way, do you see that the boy has also climbed into the tub---his leg is visible in the tub---to be able to reach into the box. Hey, it sounds like more stretching and balancing work with this apparatus.
With the holes on the sides, there are many more focal points for play.

Or from another perspective.

And there are spaces to be explored under the big box incline.

One of the things I like to do with this apparatus is add mirrors inside across the openings cut on the side of the box. Even if a child doesn't see himself, others get an interesting perspective.

This picture above shows one of the mirrors.
In addition, this picture also shows that this apparatus offers a wonderful area for focused play and exploration. This picture captures a sense of space that is made for a child. It is a space that a child can be both in and out of at the same time. Imagine what that must feel like.
Thursday, July 14, 2011
STICKS AND STONES
Back in October of last year, I wrote about rocks in water in the sensory table. Late this spring I set up a similar activity. I set out rocks, sticks, and pieces of wood---this time in sand. In the setup for October, the tray lay across the table. For this setup, the tray was a bridge connecting the sensory table to a smaller table that held three boxes of rocks and sticks.


That is the extent of the apparatus: the sensory table, sand, a wooden tray as a bridge, and lots of sticks and stones. (Notice I have not included any implements such as shovels and containers.) Finding rocks and wood is as easy as going to the river or woods for a hike. I have collected most of the rocks I use on walks along the Mississippi River here in Minnesota. Some of the driftwood and sticks also come from the river. Some of the branches, including a nice piece of bark, come from a dead maple tree we had to cut down last year. What I have, then, is a little collection of natural elements for the children explore and manipulate.
What can you do with sticks and stones?

You can bury them in the sand. Or you can look for the ones others have buried in the sand.

You can roll the wood pieces in the sand to see the interesting imprints made by the bark.

You can build with wood pieces of different sizes, shapes and textures.

You can stack rocks on a branch. But how many? Do they all have to be flat?

A piece of bark becomes an substitute shovel for digging and moving the sand.

That same piece of bark in someone else's hands becomes a slide for the rocks.

You can transport as many rocks as you can onto the tray. And as you add to the pile, can you get them to balance?

You can sprinkle the rocks with sand. (What a wonderful juxtaposition of actions and sound. Moving the hard rocks onto the tray and then lightly sprinkling them with fine sand.)

Maybe you just want to carry a stick around until you figure out what you will do with it.
What kind of imagination do you have? What could you do with these natural elements? Chances are a child's imagination trumps yours. Can you guess what this boy made?

It is a microphone. He took a stick and propped it up in the table. Next, he took a knot from a tree and put it on the stick through the hole in the knot. Viola, he has a microphone.
In my blog reading, I have not found anyone writing about bringing sticks indoors into the sensory table. I have, however, found bloggers who write about sticks as important outdoor learning tools for children. One is Juliet from Scotland with a blog entitled: I'm a teacher, get me OUTSIDE here! Two posts in particular to read are: Sticks in School and Making skeletons (using sticks). Another blogger is Jenny from Australia who has a blog called: let the children play. Two posts in particular to read are: ideas for adding natural elements and celebrating loose parts. And one other post that was just penned earlier today is from teacher tom in Seattle called Bumps and Bruises. Check them out.
Thursday, July 7, 2011
NARROW PVC TUBES---WORM SLIDE
Last week I wrote about a large PVC tube with funnels on a slight incline. Let me introduce you to narrow tubes on a greater incline, something I like to call the Worm Slide.

To make it, set a tray in the table and then tape a crate to the tray.


Now if you were paying close attention, you would have seen two different apparatus. The first is set on two trays and has two fairly narrow tubes with slits cut the length of the the tubes. The one above is set on one tray and has a larger tube with a fairly wide slit cut down the length of the tube and a piece of plastic from a window that serves nicely for a wider slide.
The reason I point this out is that I do a version of this apparatus every year and every year it turns out a differently depending on the tubes or slides I choose to use. This year I used a plastic cover from a florescent light, a long narrow tube with a slit cut down its length, and a plastic angle piece from a replacement window.

And this year, the only piece I threaded through the crate was the angle and it is the only piece that directs water and worm flow inside the table.. The other two pieces I taped to the top edge of the crate. These two pieces do empty in a tub next to the table.

So why do I call this a worm slide? Watch.
Did you see the worm slide?
Several years ago I was walking through a sports store and saw a "bucket of worms" on sale. The worms are really artificial fishing bate without the hooks. There were things in the bucket that looked like worms and some things looked like other water creatures and some things looked like creatures from somebody's imagination. At first I thought I would just put them in the water table, but then I decided that there would be more exploration with the tubes and slides on an incline.
The creatures are easily carried down the larger slide when the water is poured it. It gets a little trickier when the worms are put in the narrow tube. First, it is harder to pour water into the smaller tube and second, sometimes the worms get stuck.

What else can you do with worms?

You can find other holes to put them in.
 You can collect them in a minnow net. (This was the first apparatus with which I used a minnow net. I now use it with other apparatus and with different medium, like here
Or you can feed the fish!

Either this boy knows fish eat worms or like all children, he has an overriding compulsion to put things in holes.
I could just have easily called it a fish slide, too.
Did you notice that the boy in the video cannot see the fish slide down when he pours the water? The sides of the florescent cover are too high. He does come around to see if the fish is still in the slide. When he no longer sees it in the slide, he declares: "It goes down." How is that for a logical conclusion after taking in the facts from his little experiment?
You just got to love those little scientists.

To make it, set a tray in the table and then tape a crate to the tray.

Then thread the tubes through the crate so that the ends of the tubes reach past the table and over a tub on the side of the table.
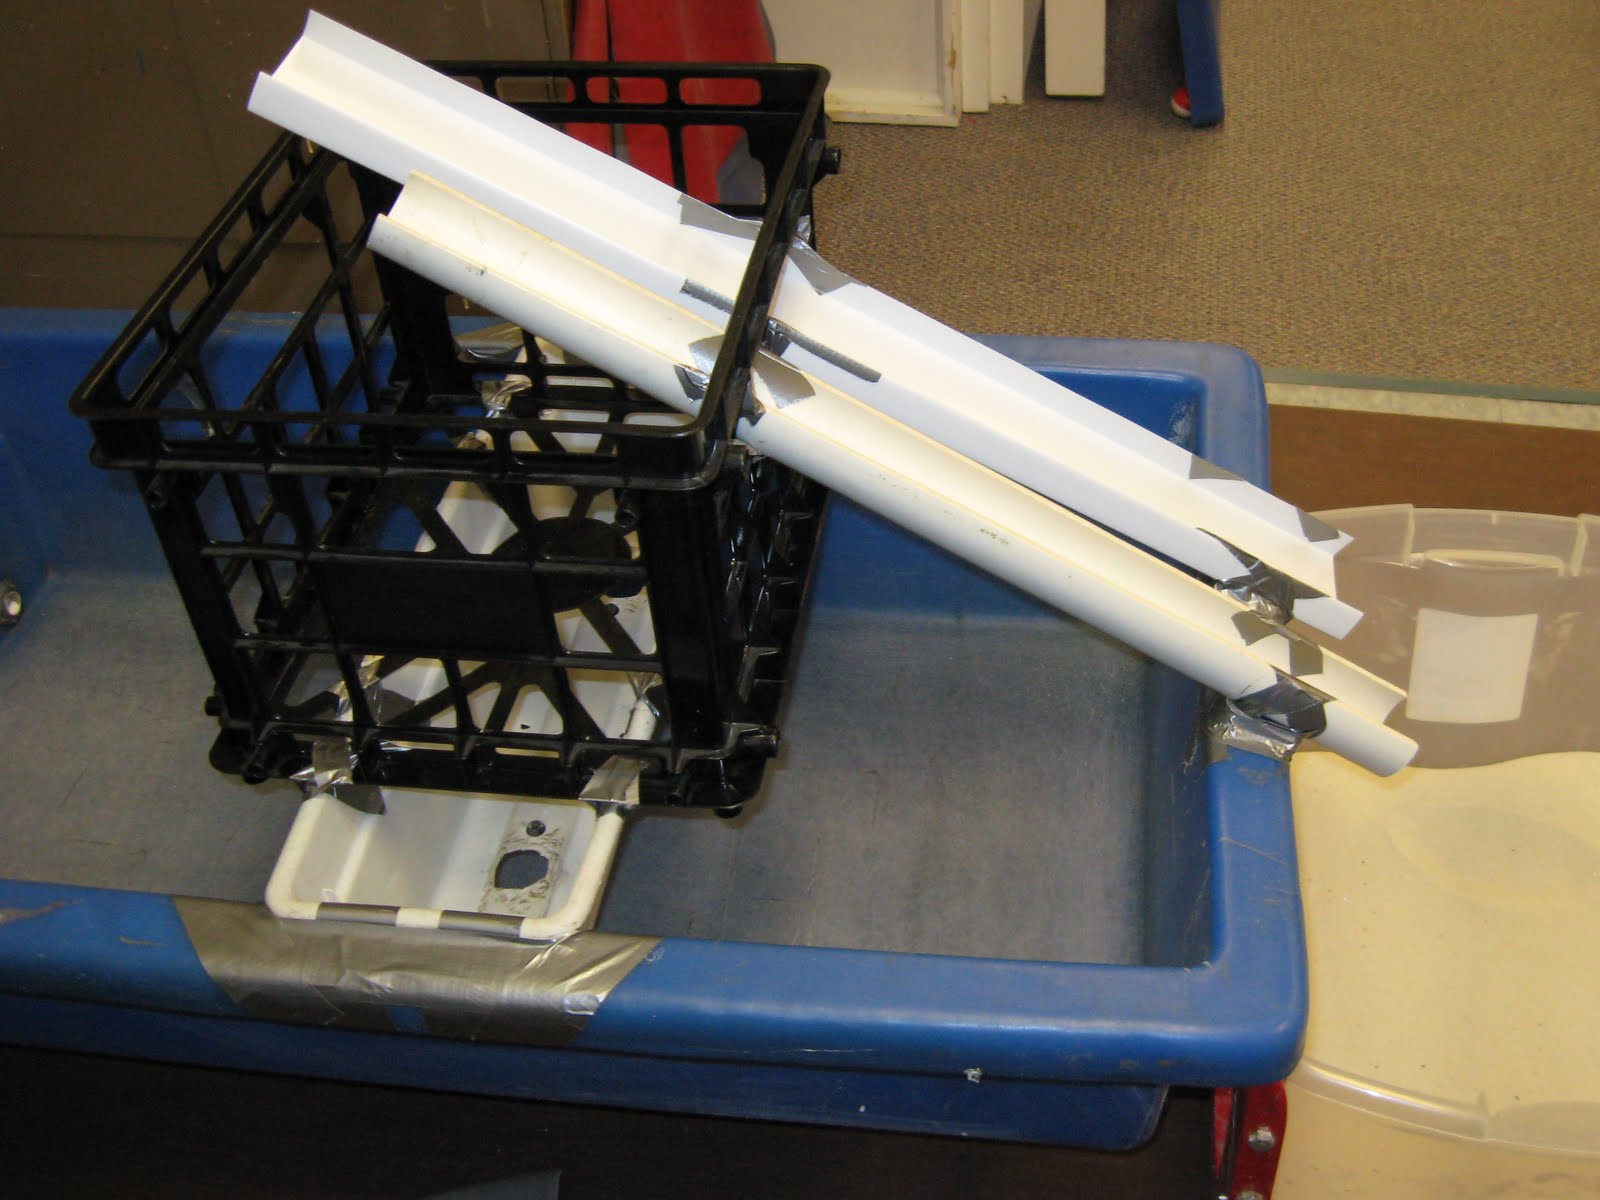
Now if you were paying close attention, you would have seen two different apparatus. The first is set on two trays and has two fairly narrow tubes with slits cut the length of the the tubes. The one above is set on one tray and has a larger tube with a fairly wide slit cut down the length of the tube and a piece of plastic from a window that serves nicely for a wider slide.
The reason I point this out is that I do a version of this apparatus every year and every year it turns out a differently depending on the tubes or slides I choose to use. This year I used a plastic cover from a florescent light, a long narrow tube with a slit cut down its length, and a plastic angle piece from a replacement window.

And this year, the only piece I threaded through the crate was the angle and it is the only piece that directs water and worm flow inside the table.. The other two pieces I taped to the top edge of the crate. These two pieces do empty in a tub next to the table.

So why do I call this a worm slide? Watch.
Did you see the worm slide?
Several years ago I was walking through a sports store and saw a "bucket of worms" on sale. The worms are really artificial fishing bate without the hooks. There were things in the bucket that looked like worms and some things looked like other water creatures and some things looked like creatures from somebody's imagination. At first I thought I would just put them in the water table, but then I decided that there would be more exploration with the tubes and slides on an incline.
The creatures are easily carried down the larger slide when the water is poured it. It gets a little trickier when the worms are put in the narrow tube. First, it is harder to pour water into the smaller tube and second, sometimes the worms get stuck.

What else can you do with worms?

You can find other holes to put them in.

Or you can feed the fish!

Either this boy knows fish eat worms or like all children, he has an overriding compulsion to put things in holes.
I could just have easily called it a fish slide, too.
Did you notice that the boy in the video cannot see the fish slide down when he pours the water? The sides of the florescent cover are too high. He does come around to see if the fish is still in the slide. When he no longer sees it in the slide, he declares: "It goes down." How is that for a logical conclusion after taking in the facts from his little experiment?
You just got to love those little scientists.
Subscribe to:
Posts (Atom)